Using the Logitech Control Center (LCC) software, you can customize what each mouse button does and also have each button automatically change to a different action when you switch to another application.
For example, let's say we want the Back button (found on the left side of the mouse) to work in our internet browser as a back button, taking us back to your previously viewed webpage but when we switch to iTunes, we would like this button to function as a stop and pause button.
Using this example, we will customize the back button to change what it does when iTunes is the active application. This process is universal and applies to all buttons on your mouse or keyboard.
Customizing the Cordless Desktop Wave mouse buttons
Changing the function of a button to perform a specific task.
-
Open LCC by clicking the Apple icon in the upper left corner of your desktop and selecting “System Preferences…” from the menu.

-
In the System Preferences, find the Logitech Control Center at the bottom of the window under “Other”.

If you cannot find LCC in the system preferences or you do not have the Mac software for your device installed, you can download it on our Cordless Desktop Wave Downloads Page.
-
Double click on the image of your mouse when you see the Wave keyboard and the LX8 Mouse displayed.

LCC will display a configuration screen as shown below.
Using Settings
The Logitech Control Center allows you to make settings specific to each application. For example, if you want the wheel button to play and pause a song in iTunes but open Spotlight in the finder, you can create a new setting for iTunes. To do this:
-
Click the plus (+) button on the top of the Device Manager window.

-
Select the application you want to make specific settings for. In this example, we’ll choose iTunes from our application list. Click Select when you are done (as shown below).

-
You will now see the iTunes settings when you click the drop down menu initially labeled “Global Settings.”

NOTE: Any configurations made under Global Settings will effect all applications NOT listed as a separate setting. In our iTunes example, the default option of our back key (Command-arrow) will remain for all applications except for iTunes.
Configuring Mouse Buttons
Now that we’ve created a special application setting for iTunes, we will make our button configuration under this new setting, since we want this button to do this specific task only in iTunes. To configure the mouse:
-
Select a Setting. In this case, we’ll select the new iTunes setting we just created.

-
Now we will select our button by clicking our option only once. (See the figure at the end of this article for a layout of the buttons available for configuration.)
-
Move your cursor to the phrase “Keystroke” under the “Assigned action” column as shown below:

-
Click the Keystroke option to configure this button.

-
Using this menu, we can choose from a list of several tasks and actions that we can apply to our button.
-
Since we know the SPACE BAR pauses and plays a selected song in iTunes, we will simply change the keystroke configuration. Scroll to the bottom of this article for a list and definitions of these options.
NOTE: Not all buttons may have the same options.
-
Type SPACEBAR on your keyboard. The word “Space” will appear in the box under “Type a key….” If nothing happens, place your cursor over the ‘Type a key…’ field and click once and type SPACEBAR again.

-
Make sure there are no modifier keys selected.
- When selected, these keys execute the same function as if you pressed the modifier key with the key you specified. This may be useful to you if you would like to program a button to save a file (command-S), empty the trash (command-shift-delete), or undo your last action in an application (Command-Z).
-
Close the Device Manager window when you are done.
Our back button is now configured to start and stop when iTunes is the active application. To test your changes, open itunes, select a media file, and press the back button to start and pause the music or video.
Also notice that when switching your application to your web browser, the button now functions as the back button (Command-arrow).
Repeat these steps to add, modify, or delete actions and tasks for any button in any application.
NOTE: These settings will not be available for other user accounts on your Mac.
Additional Information
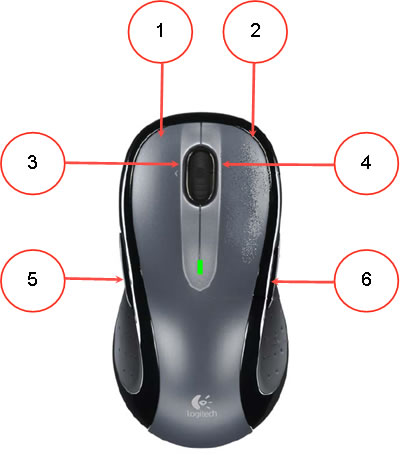
- Left Button
- Light Button
- Wheel (Spin)
- Tilt Left/Right (Push on the left or right side of the wheel to activate these buttons).
- Thumb Back Button
- Thumb Forward Button
Descriptions of tasks are located on your computer once LCC is installed. To find a list of these descriptions:
-
Open LCC from the System Preferences.
-
Double click on the image of your mouse or keyboard.
-
In the Device Manager menu bar, click HELP and select Logitech Control Center Help
The definitions are found in the chapter “To assign an action to a button….” Select this chapter from the bookmarks on the left side of the window under Using my mouse > Customizing buttons to perform my favorite tasks….” (See image below).

Important Notice: The Firmware Update Tool is no longer supported or maintained by Logitech. We highly recommend using Logi Options+ for your supported Logitech devices. We are here to assist you during this transition.
Important Notice: The Logitech Preference Manager is no longer supported or maintained by Logitech. We highly recommend using Logi Options+ for your supported Logitech devices. We are here to assist you during this transition.
Important Notice: The Logitech Control Center is no longer supported or maintained by Logitech. We highly recommend using Logi Options+ for your supported Logitech devices. We are here to assist you during this transition.
Important Notice: The Logitech Connection Utility is no longer supported or maintained by Logitech. We highly recommend using Logi Options+ for your supported Logitech devices. We are here to assist you during this transition.
Important Notice: The Unifying Software is no longer supported or maintained by Logitech. We highly recommend using Logi Options+ for your supported Logitech devices. We are here to assist you during this transition.
Important Notice: The SetPoint software is no longer supported or maintained by Logitech. We highly recommend using Logi Options+ for your supported Logitech devices. We are here to assist you during this transition.
Frequently Asked Questions
There are no products available for this section
There are no Downloads for this Product
There are no Downloads for this Version
Compatible Product
